It has recently come my attention that, considering I'm an avid beader and I'm ALWAYS making SOMETHING, I really don't own that much of my own work. Now that, readers, is a sad thing, as an artists should still own some of her own work. Besides, what better way to promote your work than by wearing it out? :D
Confession: I love Goldstone, especially blue goldstone. :D So when I found a HUGE collection of Blue Goldstone on my new favourite beading website, Cranberry, I just HAD to have the big one. Yep, that one right there *clicks "Add to Cart"* :D Match that with some 6mm round Blue Goldstone beads from Empire Beads, and I knew I was going to be making another of my Elegant Elements cuffs...
There wasn't too much thought behind this one. It just...WAS. Apparently, this cuff was meant to be and I was just the vessel through which it was made. Gotta love it when that happens :)
I did, however, have to use my brain for some things. Like which seed bead colours to use around the cab, ie, what went with what. THAT was difficult. I had about 4 different versions of blue that each went perfectly with the Blue Goldstone and really brought it out (not made it so dark-I didn't want it to look black), yet didn't go with each other. I finally settled with silver-lined Montana Blue, silver, and black, with the faintest hint of S/L light sapphire (I think 1 round in the end).
THE CLASP: Well, that was what this piece seemed to tell me that it wanted to be different from the rest. So it features a double clasp, which I'm quite happy with :D
What to call it? The name came to me while I was beading this cuff while watching Disney's Anastasia one night on my tiny TV next to my bed. The scene where Rasputin is singing "In The Dark Of The Night" while planning to kill Anastasia came on, and the light bulb came on in my head! I knew exactly what I wanted to call my cuff. Blue Goldstone is the darkest blue I've ever found, it's always reminded me of the night, and the darkest time of the night. So that's what this cuff became: In The Dark Of The Night. Which also sets it apart from the others (that I've made and that are still in my head), as they all have names that all start (or will start) with the main colour of the cuff.
I've already worn her 3 times (bit late with posting pictures haha) and can I just say, she is AWESOME :D I love having my own jewellery I've made :)
In other news, this is the latest collar I've been working on (and apologies for the dodgy photo, Blue Goldstone is very hard to photograph without natural light). I've done a bit more on it since this photo, and there shall definately be a blog post about it when I'm done :D
Happy beading all!
Meg
I am a self taught beader and love to create handmade jewelry. I have also started to dabble in beading "art" items, such as dolls/beaded figerines and masks. My current facination is bead embroidery, a technique I have loved for ages and have recently started to learn. You can check out my work at www.abeadedworld.etsy.com. I am also a proud member of the Etsy Beadweavers Team. You can check out their blog at: http://www.etsy-beadweavers.blogspot.com. Thanks for looking!
Showing posts with label peyote. Show all posts
Thursday, 7 June 2012
Thursday, 31 May 2012
Scrolling through the inner Workings of a Cuff pattern
I don't often do bead patterns. Especially peyote stitches patterns. Have you tried them? Following the picture pattern always does my head in. BUT when there's a word pattern, I can survive.
However, when Ann of FrancescasFancy on Etsy asked for some people to test drive some patterns/kits she had designed, I saw it as the perfect opportunity to develop this skill of reading a pattern. So I put my hand up, got sent the kit, and got to work. :D
It was a very interesting pattern to work through. I started to see the pattern come through quite quickly, and it was fun trying to work out as I went where the repeats in the design were happening. It was a very clever design.
Another great thing about doing this for Ann was that in the kit she sent me she had included delicas (cylinder beads) as the beads to use for the pattern. And my goodness WOW! I had only ever used round seed beads, and I had had some problems when doing large peyote stitched-pieces that my tension with these beads was a bit out in some places (I like to pull hard it seems...). But not with delicas! I can pull the thread like normal and it pulls all the beads together into nice locked-in rows, and it's STRAIGHT! :D :D Can't even begin to describe how excited I was to discover this.
So ever since then I've been slowly purchasing the odd packet of delicas to add to my stash. :D
So there you have it. I finished it (around my Europe trip lol), sent it off, she photographed it and listed it and sent it back and now it's part of my VERY small self-made jewellery collection. She said she couldn't believe how small my wrist was when she opened the box and saw how small I'd made the bracelet (still enough for two repeats of the main pattern)! Haha
She has named it the Scroll Works Bracelet pattern (hence the play on words in the title of this blog post ahaha), and it is one of many wonderful designs availble for you to buy and bead in her shop (I really recommend trying this one out!). Check them all out, they're awesome!
And while you're there, take a look at her Green Dragon Bracelet - Baby Dragon Fantasy Beaded Cuff. It is absolutely amazing and SUCH a clever design!
Happy beading y'all!
Meg
However, when Ann of FrancescasFancy on Etsy asked for some people to test drive some patterns/kits she had designed, I saw it as the perfect opportunity to develop this skill of reading a pattern. So I put my hand up, got sent the kit, and got to work. :D
It was a very interesting pattern to work through. I started to see the pattern come through quite quickly, and it was fun trying to work out as I went where the repeats in the design were happening. It was a very clever design.
Another great thing about doing this for Ann was that in the kit she sent me she had included delicas (cylinder beads) as the beads to use for the pattern. And my goodness WOW! I had only ever used round seed beads, and I had had some problems when doing large peyote stitched-pieces that my tension with these beads was a bit out in some places (I like to pull hard it seems...). But not with delicas! I can pull the thread like normal and it pulls all the beads together into nice locked-in rows, and it's STRAIGHT! :D :D Can't even begin to describe how excited I was to discover this.
So ever since then I've been slowly purchasing the odd packet of delicas to add to my stash. :D
So there you have it. I finished it (around my Europe trip lol), sent it off, she photographed it and listed it and sent it back and now it's part of my VERY small self-made jewellery collection. She said she couldn't believe how small my wrist was when she opened the box and saw how small I'd made the bracelet (still enough for two repeats of the main pattern)! Haha
She has named it the Scroll Works Bracelet pattern (hence the play on words in the title of this blog post ahaha), and it is one of many wonderful designs availble for you to buy and bead in her shop (I really recommend trying this one out!). Check them all out, they're awesome!
And while you're there, take a look at her Green Dragon Bracelet - Baby Dragon Fantasy Beaded Cuff. It is absolutely amazing and SUCH a clever design!
Happy beading y'all!
Meg
Labels:
abeadedworld,
Ann,
beading,
bracelet,
clever,
cuff,
etsy,
FrancescasFancy,
pattern,
peyote,
red,
Scroll Works
Thursday, 12 April 2012
The biggest seed beads you'll ever find!
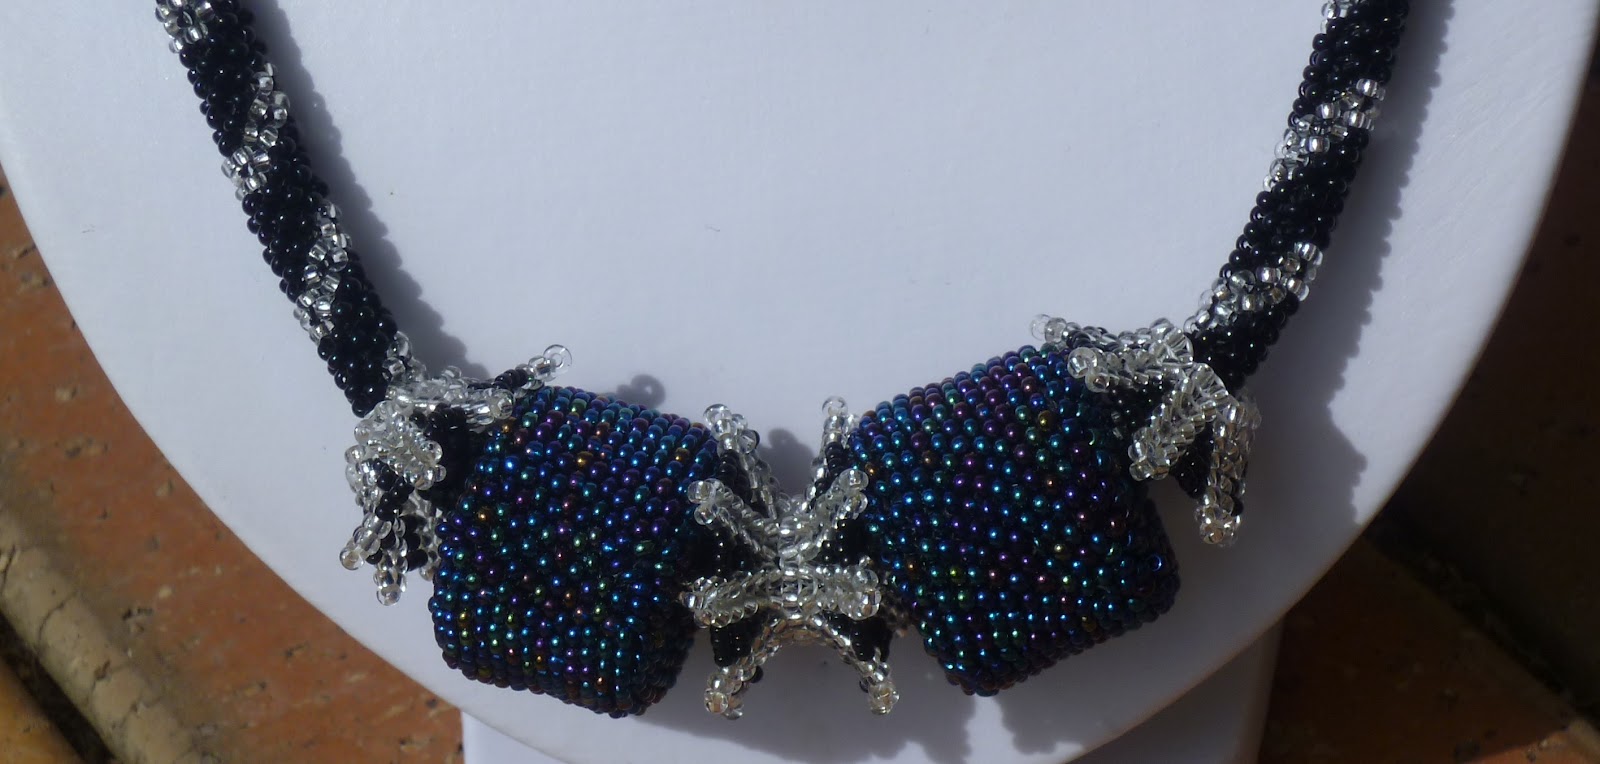
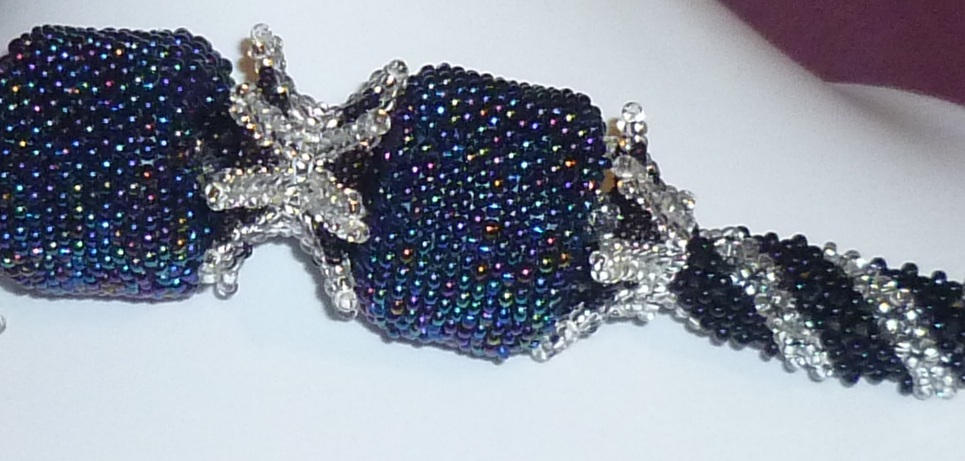
Say HELLO to the two largest seed beads. Currently, at 6:22PM Australian (in Victoria) time on the 12th of April 2012, the two above beads are the biggest seed beads you'll find anywhere (well, according to google)!
This month at the Etsy Bead Weavers Team, the challenge was "Seed Beads Only." Participants were challenged to create a piece of work using only seed bead (ie, round or delicas mainly).
I thought long and hard about this challenge theme about what I could make, and I couldn't think of anything! I thought I wouldn't be entering, until I had a dream a couple of weeks ago about giant seed beads. And I thought, what the heck? Nothing speaks "seed beads only" better than giant seed beads!
If you remove the beadwork over the seed beads you'll find blue polymer clay rings underneath. They look quite basic but they actually took a LOT of work. I wanted the colour to match the beads I was going to use (blue iris), so I spent an entire afternoon trying to make the perfect colour blend. They mainly consist of light blue perle, but I also incorporated black (make it darker), royal blue, sky blue, a blue in between the previous two shades listed, and just the faintest hint of purple. I think I did quite a good job to be honest! They had to match the beads properly so they couldn't be seen at all through the gaps in the bead work, as this wouldn't have had just eed beads showing, and that would have been against the rules (can you imagine if I'd used bright yellow?). There was also the issue of trying to make strips of this colour the same width and height, and then joining the strips into rings with them all having the same circumference, and not having the join thicker than the rest of the ring.
I had originally intended to make 6 beaded seed beads (I made 6 rings! The looked like blue cheezles when I took them out of the oven!), but after taking almost 2 weeks to bead just two, I was fast running out of time. So I left it with two.
In my head I had imagined beading around the PMC rings long ways in tubular peyote stitch using 11os. But after beading several rows I found that the beading that was going around the inside of the ring was ending up further along than that on the outside, and so the nice neat rows were suddenly out of wack. So I changed to using 15os when I got to the inside, and kept the 11os on the outside, and cut out the original rows I'd done. Yet after several round of that (more than just using 11os) I found the same thing to be happening. So finally I stopped doing that section, and started another section a third of the way around the ring, and beaded this section until the frustrating wacky-ness began to start again and the 15os inside the ring joined up, and then did another segment. Finally, when the inside was all zipped up, I filled in the gaps on the outside until I could zip up the outside beadwork. Whew! A LOT of work!
The next drama I had was trying to work out how I could separate the beads on the rope, as I wanted them to be the focal point, so I needed something to space them out a bit. Space... Hmmm, spacers!! A friend of mine had once shown me a picture of some beaded spacers she'd found somewhere, so I tried to create something that looked like what I could remember of it. I had recently found instructions to increasing within the herringbone stitch, and after a bit of thought and trial and error and bit of excess thread and sicssors, the above pictured beaded spacers were born! I'm quite happy with them, so hopefully I can remember how to do them for future works!
The rope was also interesting (and time consuming, and trial and error!). I used right angle weave (RAW), but I wanted to have a silver pattern running through it. So I drew out a few rows of RAW and coloured in a diagonal line of where the silver (these "few rows" turned into a whole page lol) and began beading. I've never beaded RAW off a chart before... But I have only done it twice :P This massive long strip of RAW I then sewed into a massive long tube around a black leather cord. The clasp is simply peyote stitched. I ended up using three stitches in this necklace: peyote, herringbone and RAW.
Making these beads (actually, this whole necklace) was very much trial and error. I'm not generally very good at designing my own beadwoven (ie, specifically beadwoven, bead embroidery is easier) creations without a pattern of some sort. I don't know how to manipulate stitches to do certain things, or to fit with certain beads, or to work in some special way, very well, so trying to create what was in my brain was an extra challenge for me. But I have found this to be getting easier to do (althought I have such a long way to go!) with the more bead embroidery I do, as it allows me to explore the concept of design and I can actually create what's in my head!
I hope you like Size 0.005, the largest seed beads you'll ever find. It was definately an experience!
Voting for the "Seed Beads only" EBWC is currently happening on the blog, so feel free to head on over and vote for your favourite between now and April 15th (mine is number 36, if your favourite happens to be mine)! :)
Happy Beading!!
Meg
This month at the Etsy Bead Weavers Team, the challenge was "Seed Beads Only." Participants were challenged to create a piece of work using only seed bead (ie, round or delicas mainly).
I thought long and hard about this challenge theme about what I could make, and I couldn't think of anything! I thought I wouldn't be entering, until I had a dream a couple of weeks ago about giant seed beads. And I thought, what the heck? Nothing speaks "seed beads only" better than giant seed beads!
If you remove the beadwork over the seed beads you'll find blue polymer clay rings underneath. They look quite basic but they actually took a LOT of work. I wanted the colour to match the beads I was going to use (blue iris), so I spent an entire afternoon trying to make the perfect colour blend. They mainly consist of light blue perle, but I also incorporated black (make it darker), royal blue, sky blue, a blue in between the previous two shades listed, and just the faintest hint of purple. I think I did quite a good job to be honest! They had to match the beads properly so they couldn't be seen at all through the gaps in the bead work, as this wouldn't have had just eed beads showing, and that would have been against the rules (can you imagine if I'd used bright yellow?). There was also the issue of trying to make strips of this colour the same width and height, and then joining the strips into rings with them all having the same circumference, and not having the join thicker than the rest of the ring.
I had originally intended to make 6 beaded seed beads (I made 6 rings! The looked like blue cheezles when I took them out of the oven!), but after taking almost 2 weeks to bead just two, I was fast running out of time. So I left it with two.
In my head I had imagined beading around the PMC rings long ways in tubular peyote stitch using 11os. But after beading several rows I found that the beading that was going around the inside of the ring was ending up further along than that on the outside, and so the nice neat rows were suddenly out of wack. So I changed to using 15os when I got to the inside, and kept the 11os on the outside, and cut out the original rows I'd done. Yet after several round of that (more than just using 11os) I found the same thing to be happening. So finally I stopped doing that section, and started another section a third of the way around the ring, and beaded this section until the frustrating wacky-ness began to start again and the 15os inside the ring joined up, and then did another segment. Finally, when the inside was all zipped up, I filled in the gaps on the outside until I could zip up the outside beadwork. Whew! A LOT of work!
The next drama I had was trying to work out how I could separate the beads on the rope, as I wanted them to be the focal point, so I needed something to space them out a bit. Space... Hmmm, spacers!! A friend of mine had once shown me a picture of some beaded spacers she'd found somewhere, so I tried to create something that looked like what I could remember of it. I had recently found instructions to increasing within the herringbone stitch, and after a bit of thought and trial and error and bit of excess thread and sicssors, the above pictured beaded spacers were born! I'm quite happy with them, so hopefully I can remember how to do them for future works!
The rope was also interesting (and time consuming, and trial and error!). I used right angle weave (RAW), but I wanted to have a silver pattern running through it. So I drew out a few rows of RAW and coloured in a diagonal line of where the silver (these "few rows" turned into a whole page lol) and began beading. I've never beaded RAW off a chart before... But I have only done it twice :P This massive long strip of RAW I then sewed into a massive long tube around a black leather cord. The clasp is simply peyote stitched. I ended up using three stitches in this necklace: peyote, herringbone and RAW.
Making these beads (actually, this whole necklace) was very much trial and error. I'm not generally very good at designing my own beadwoven (ie, specifically beadwoven, bead embroidery is easier) creations without a pattern of some sort. I don't know how to manipulate stitches to do certain things, or to fit with certain beads, or to work in some special way, very well, so trying to create what was in my brain was an extra challenge for me. But I have found this to be getting easier to do (althought I have such a long way to go!) with the more bead embroidery I do, as it allows me to explore the concept of design and I can actually create what's in my head!
I hope you like Size 0.005, the largest seed beads you'll ever find. It was definately an experience!
Voting for the "Seed Beads only" EBWC is currently happening on the blog, so feel free to head on over and vote for your favourite between now and April 15th (mine is number 36, if your favourite happens to be mine)! :)
Happy Beading!!
Meg
Subscribe to:
Posts (Atom)