About Me

My photo
Australia
Self Taught Bead Artist

Thursday 19 April 2012

Lime Spider

I had last week off Uni due to Easter. It was a glorious 10 days indeed. I worked, and watched movies, and SLEPT IN, and did some good ol' study (and now I'm back at Uni and I wish I were still on holidays... :P). A nice break.

And what would a break be (or any day for that matter) if I didn't do any beading? :D As a study procrastination, I created the following:

Allow me to introduce to you "Lime Spider!" She's the next in my Elegant Elements Cuff Collection.
This cuff features a large cat's eye cabochon matched with the same type of beads I used in Red Beauty, but obviously in lime green this time. For this cuff I decided to use black as the background this time (I'm aiming to use neutral colours for the background in all the cuffs, except perhaps one...), and I think it gives it a funky, sassy feel. I'm very happy with the results.

You can see that, when the cuff bends, you can slightly see the pale green suede I beaded on underneath. At first I wasn't happy about this, but then after a while I decided I liked it. It's just a hint of green and I think it gives a nice effect...

The beauty of using cat's eye cabochons or beads is the way it reflects light. I was quite facinated with the textures within the colours of the cab depending on the angle of the light that shone on it. Away from direct light, it's a quite dark green, but shine some light on it and these playful lines of light green and lime start to appear. It was for this reason I had diffuculty deciding what colour green I should use to bezel the cab. If you look closely at Red Beauty's cab, I used three different types: a light transparent red, then a dark transparent red after a few rounds, and finally finishing with a silver-lined dark red. I wanted to keep this the same with all the cuffs. So in Lime Spider I finally decided on lime transparent, then dark transparent green, before finishing up with a silver lined dark green. I think it works well. Finishing with a silver-lined round of seed beads seems to give the cab a hint of brightness, which I had noticed with Red Beauty as well. This effect will DEFINATELY be kept constant in future cuffs in the collection.

I'm still playing around with the clasps on these cuffs, so while this one is quite similar to that in Red Beauty, it still has a few differences. Firstly, because Lime Spider is shorter in length than Red Beauty (it currently actually fits me, can you believe it?!), the beaded band that connects the toggle loop to the actual cuff had to be longer. I'm happy with how this clasp looks, but in future I feel that the band should be wider (thoughts?), as the cuff itself is quite wide.
I had also been recently reading through some beading books/mags/websites/etc (AGAIN :P) and I kept seeing an interesting type of clasp come up again and again, where the peyote loop almost looked embellished. Finally I discovered that it involved using two sizes of seed beads. So here it is!

(see, told you it fits :P)

I used a different kind of suede than that of Red Beauty, and so this one feels even more soft on your skin! It feels very nice, may I just say. :)

And of course, everyone loves free stuff, so here's the free pair of matching earrings that come with the cuff.

So there you have it: Lime Spider, the second installment to the Elegant Elements Cuff Collection. Hope you enjoy her!

Oh, study break's now over, back to work... Y'know, I haven't beaded for a week just so I can't get distracted with how that wonderful braelet is looking so far, how nicely that collar is coming together, how absolutely gorgeous that pendant will be if I can just allow myself to finish it... (Stop it Meg, you're getting ideas :P) Let's just say I'm having withdrawals again...

Happy beading!
Meg

Saturday 14 April 2012

Red Beauty

One day I went to the local craft store and began buying beads, as you do, and I came upon a large, coral-red, oval cabochon. Actually, I found a lot of cabs, and this was one of the ones that caught my eye (this craft store doesn't generally have cabochons, so I get excited when I can find some). So I began to look for some beads that might go with it and found some red glass beads with a "funky" coating on them. I'd been wanting to make a bracelet for someone for a while, and this seemed perfect!


So when I got home, I drew out a design, cut out a template and traced it onto my suede and glued on the lovely stone cab I'd just bought, plus two smaller goldstone cabochons. And then I find out that the person that I'd originally intended this cuff for didn't actually like this shade of red, nor did she like to wear bracelets. WELL. That was a bummer. Now what?


So I did the only thing natural: I threaded my needle, picked up some seed beads and began bezelling the cab. :D I sewed on the glass beads in a pattern, and beaded around them in a circle-y/swirly pattern.


As I was beading I imagined making several of these cuffs in different colours, all with the same basic style but each having something slightly different about them (I know that the thing that will separate this cuff from the rest is the two smaller cabochons). I could have a collection, and sell them all! So the Elegant Elements Cuff Collection was born.


NOTE: due to the fact that this cuff WAS actually intended for a specific person, it is a bit bigger than what the other ones will be. This cuff will fit a minimum wrist of 7.25"-7.5".


Gold, red and a little bit of bronze make up this cuff. It's finished with a peyote stitched loop and bead clasp. I used silver lined seed beads, and when it's in the sun this cuff really sparkles and shines! I couldn't stop drooling over it! If it wasn't for the fact that I also don't wear red (I have one shirt with red on it, and it's red and white striped), and that my wrist is half the size of this cuff (I'm tiny haha) I would keep it! But I don't, and it isn't, so I won't.

SO. That means it is available for purchase by you, dear reader, or by that girl down the street, or the nice lady who's currently internet shopping. And I haven't even told you about the BONUS GIFT that comes with the purchase of this cuff: A free pair of earrings! I had a few of those glass beads left over (they came in a pack of 6mm and 10mm beads), so I made a pair of matching earrings. This will be the case with every cuff in this cuff collection (to see all my collections, including my Seasons Collection, click on the "Collections" section in my shop).


Due to my opinion that this cuff is absolutely awesome, and indeed IS One Of A Kind (OOAK), and that it looks a real beauty in the sunshine, and that I REALLY wish I wore red (:P) I have decided to name her "Red Beauty."


Thankyou very much for looking, and being a part of my excitement for my brand new collection! "Lime Spider" is up next :D

Keep Beading
Meg

Thursday 12 April 2012

The biggest seed beads you'll ever find!

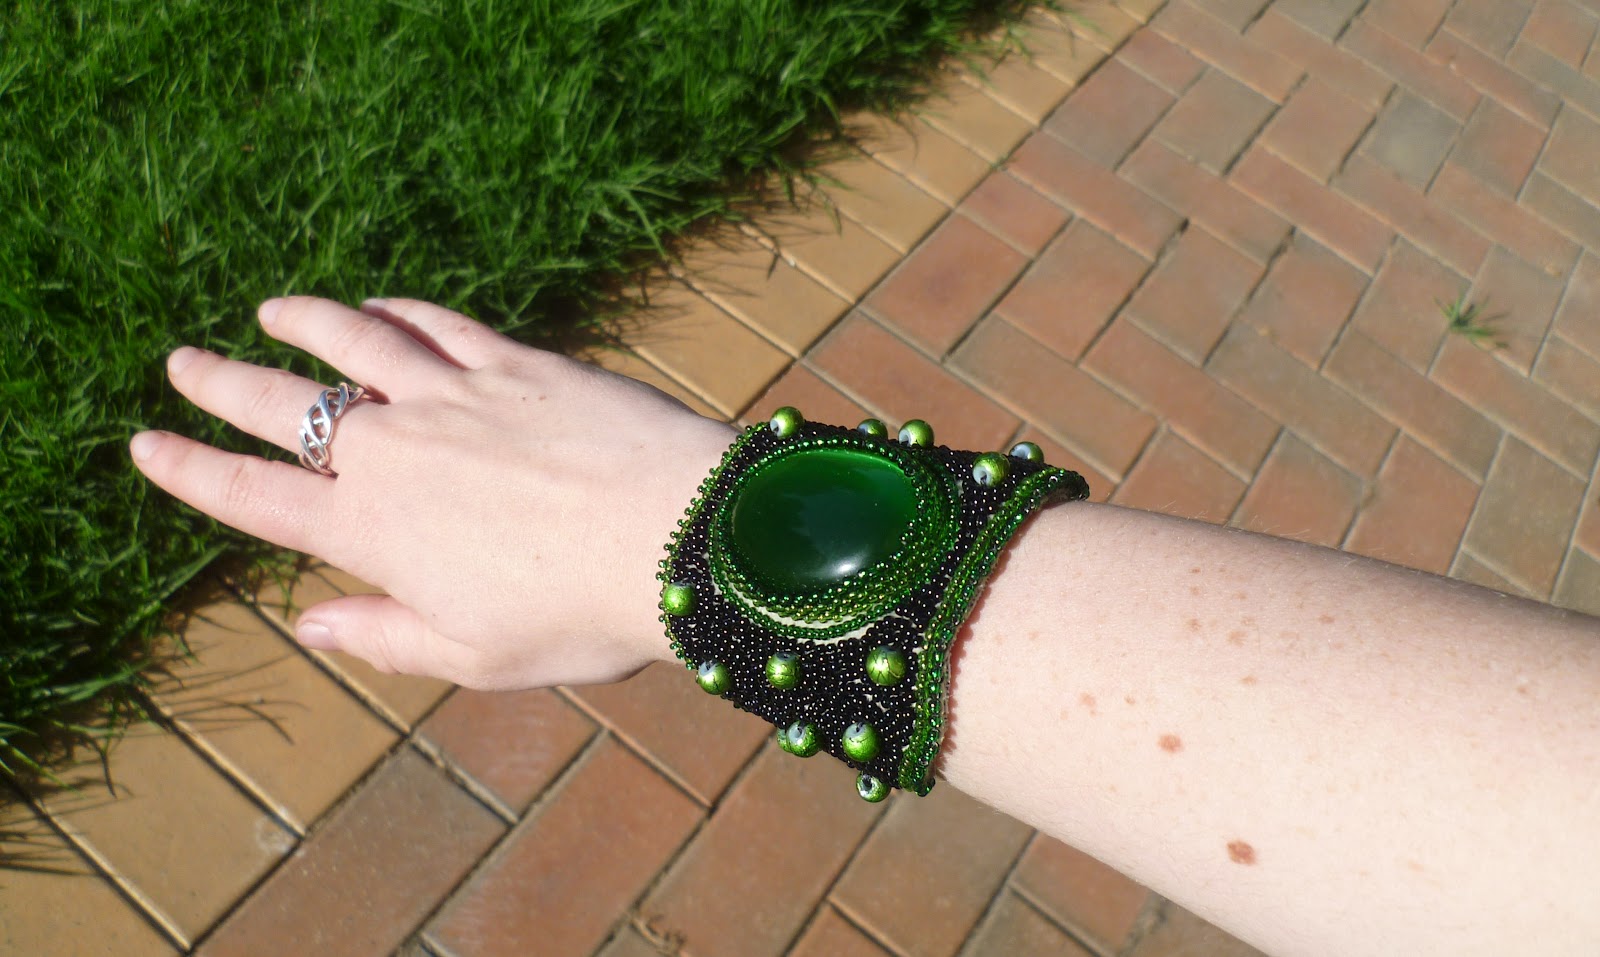
Say HELLO to the two largest seed beads. Currently, at 6:22PM Australian (in Victoria) time on the 12th of April 2012, the two above beads are the biggest seed beads you'll find anywhere (well, according to google)!

This month at the Etsy Bead Weavers Team, the challenge was "Seed Beads Only." Participants were challenged to create a piece of work using only seed bead (ie, round or delicas mainly).

I thought long and hard about this challenge theme about what I could make, and I couldn't think of anything! I thought I wouldn't be entering, until I had a dream a couple of weeks ago about giant seed beads. And I thought, what the heck? Nothing speaks "seed beads only" better than giant seed beads!

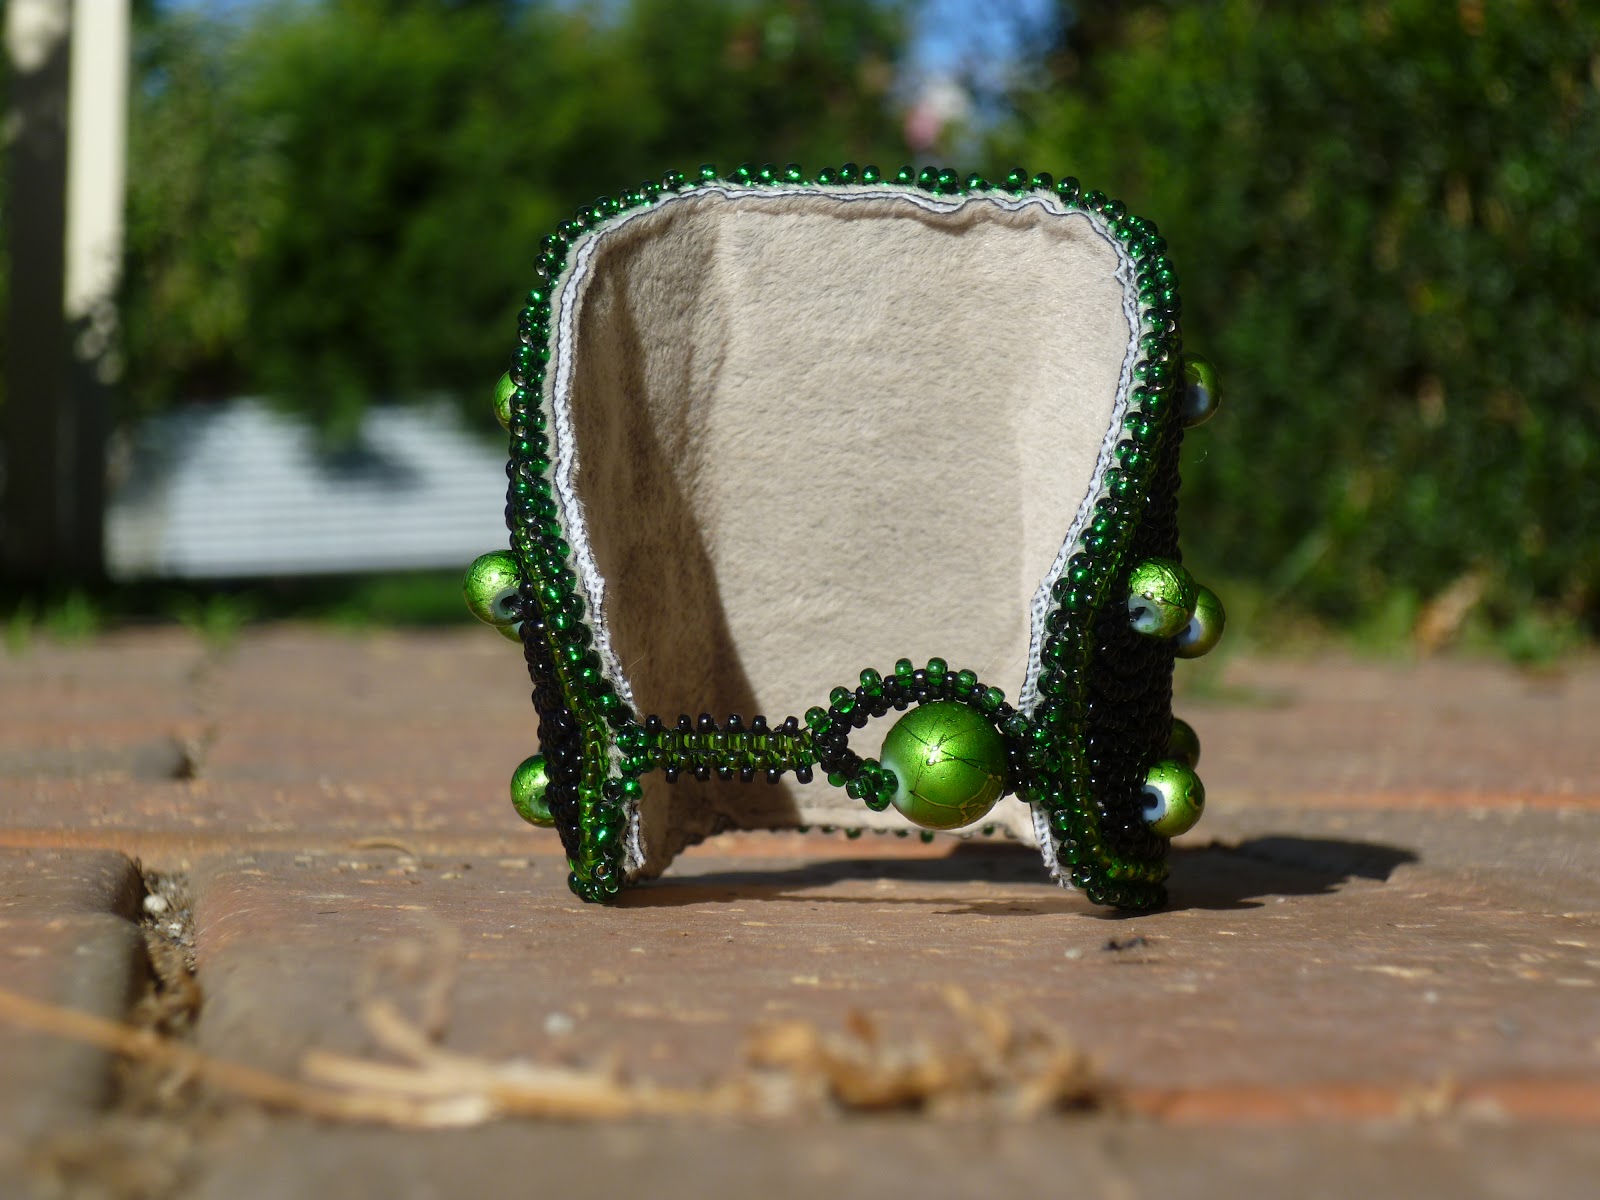
If you remove the beadwork over the seed beads you'll find blue polymer clay rings underneath. They look quite basic but they actually took a LOT of work. I wanted the colour to match the beads I was going to use (blue iris), so I spent an entire afternoon trying to make the perfect colour blend. They mainly consist of light blue perle, but I also incorporated black (make it darker), royal blue, sky blue, a blue in between the previous two shades listed, and just the faintest hint of purple. I think I did quite a good job to be honest! They had to match the beads properly so they couldn't be seen at all through the gaps in the bead work, as this wouldn't have had just eed beads showing, and that would have been against the rules (can you imagine if I'd used bright yellow?). There was also the issue of trying to make strips of this colour the same width and height, and then joining the strips into rings with them all having the same circumference, and not having the join thicker than the rest of the ring.

I had originally intended to make 6 beaded seed beads (I made 6 rings! The looked like blue cheezles when I took them out of the oven!), but after taking almost 2 weeks to bead just two, I was fast running out of time. So I left it with two.

In my head I had imagined beading around the PMC rings long ways in tubular peyote stitch using 11os. But after beading several rows I found that the beading that was going around the inside of the ring was ending up further along than that on the outside, and so the nice neat rows were suddenly out of wack. So I changed to using 15os when I got to the inside, and kept the 11os on the outside, and cut out the original rows I'd done. Yet after several round of that (more than just using 11os) I found the same thing to be happening. So finally I stopped doing that section, and started another section a third of the way around the ring, and beaded this section until the frustrating wacky-ness began to start again and the 15os inside the ring joined up, and then did another segment. Finally, when the inside was all zipped up, I filled in the gaps on the outside until I could zip up the outside beadwork. Whew! A LOT of work!

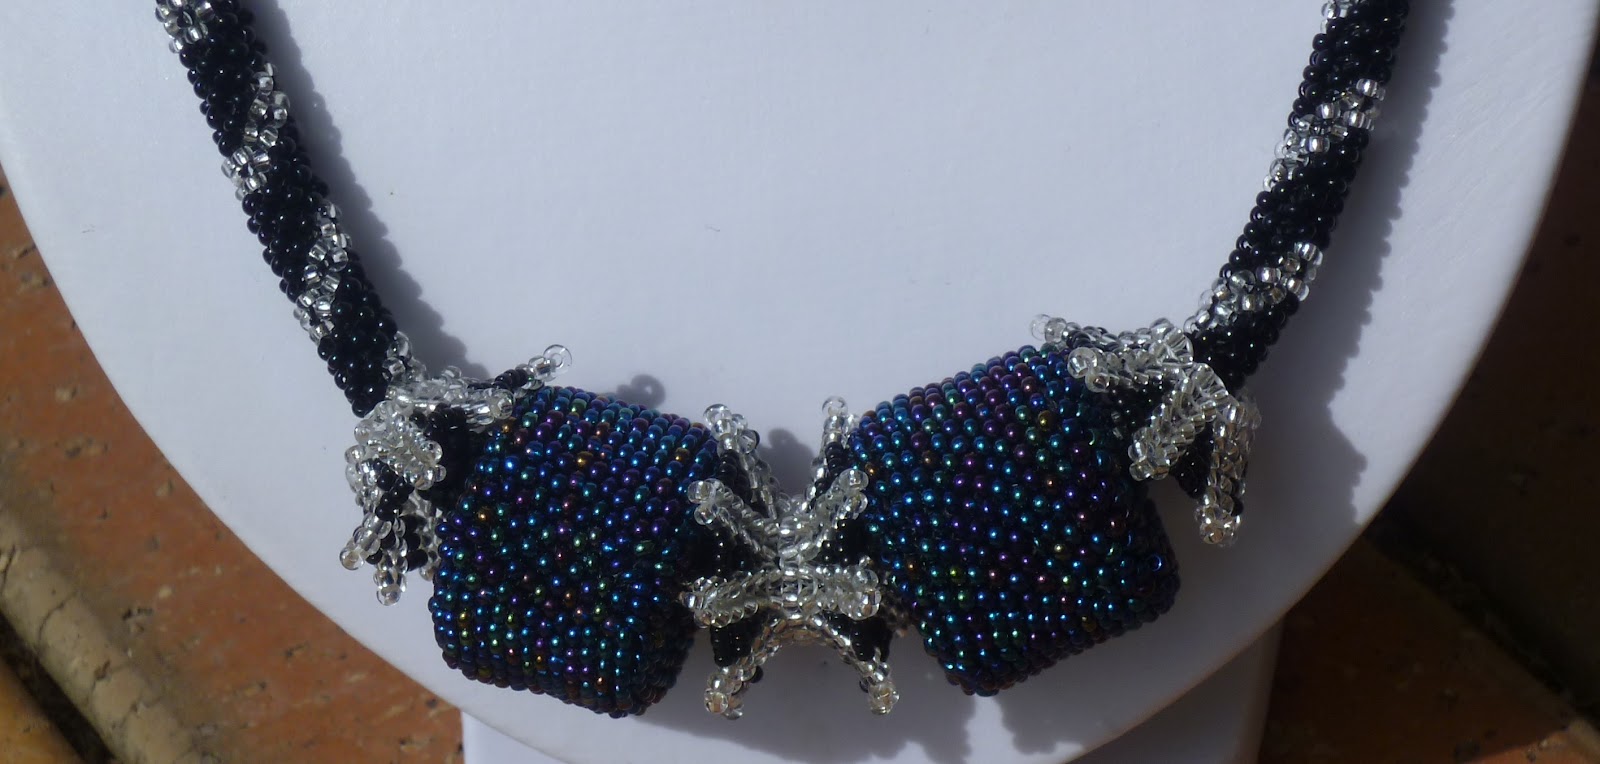
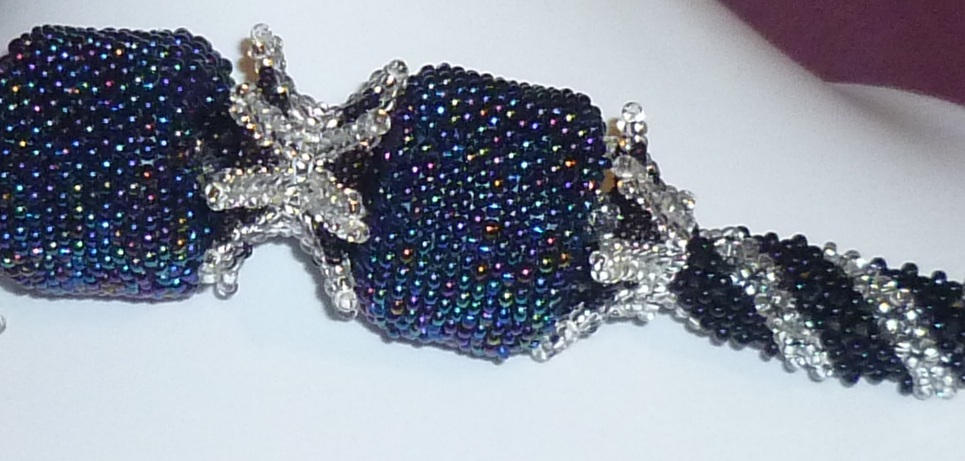
The next drama I had was trying to work out how I could separate the beads on the rope, as I wanted them to be the focal point, so I needed something to space them out a bit. Space... Hmmm, spacers!! A friend of mine had once shown me a picture of some beaded spacers she'd found somewhere, so I tried to create something that looked like what I could remember of it. I had recently found instructions to increasing within the herringbone stitch, and after a bit of thought and trial and error and bit of excess thread and sicssors, the above pictured beaded spacers were born! I'm quite happy with them, so hopefully I can remember how to do them for future works!

The rope was also interesting (and time consuming, and trial and error!). I used right angle weave (RAW), but I wanted to have a silver pattern running through it. So I drew out a few rows of RAW and coloured in a diagonal line of where the silver (these "few rows" turned into a whole page lol) and began beading. I've never beaded RAW off a chart before... But I have only done it twice :P This massive long strip of RAW I then sewed into a massive long tube around a black leather cord. The clasp is simply peyote stitched. I ended up using three stitches in this necklace: peyote, herringbone and RAW.


Making these beads (actually, this whole necklace) was very much trial and error. I'm not generally very good at designing my own beadwoven (ie, specifically beadwoven, bead embroidery is easier) creations without a pattern of some sort. I don't know how to manipulate stitches to do certain things, or to fit with certain beads, or to work in some special way, very well, so trying to create what was in my brain was an extra challenge for me. But I have found this to be getting easier to do (althought I have such a long way to go!) with the more bead embroidery I do, as it allows me to explore the concept of design and I can actually create what's in my head!

I hope you like Size 0.005, the largest seed beads you'll ever find. It was definately an experience!

Voting for the "Seed Beads only" EBWC is currently happening on the blog, so feel free to head on over and vote for your favourite between now and April 15th (mine is number 36, if your favourite happens to be mine)! :)

Happy Beading!!
Meg