I had last week off Uni due to Easter. It was a glorious 10 days indeed. I worked, and watched movies, and SLEPT IN, and did some good ol' study (and now I'm back at Uni and I wish I were still on holidays... :P). A nice break.
And what would a break be (or any day for that matter) if I didn't do any beading? :D As a study procrastination, I created the following:
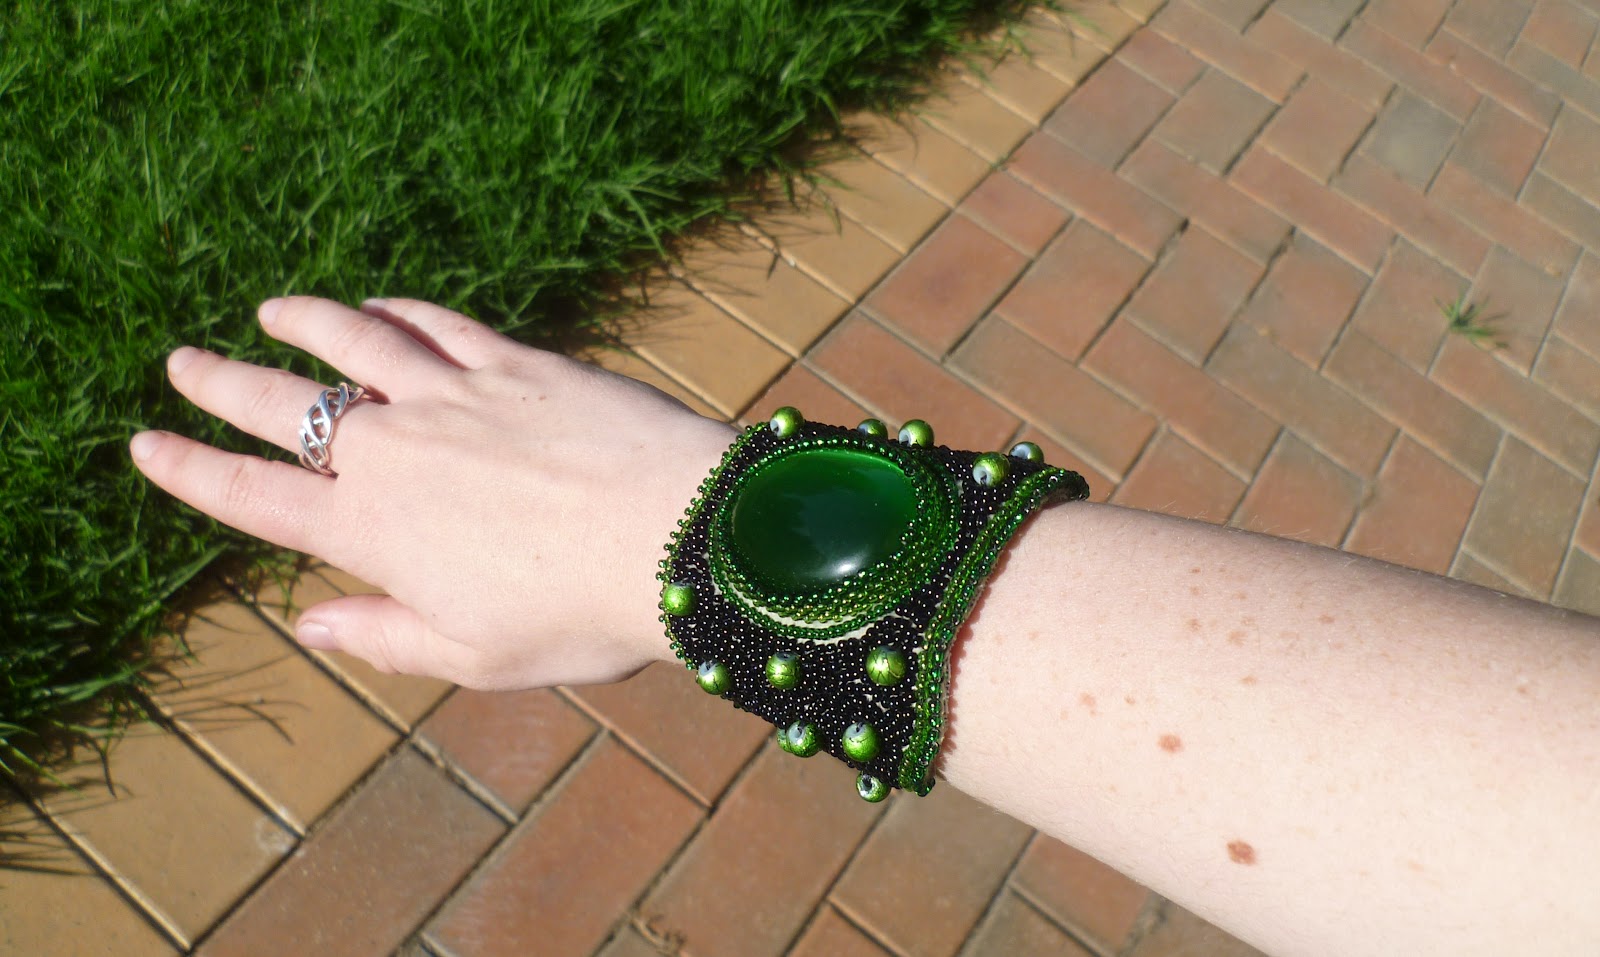
Allow me to introduce to you "Lime Spider!" She's the next in my Elegant Elements Cuff Collection.
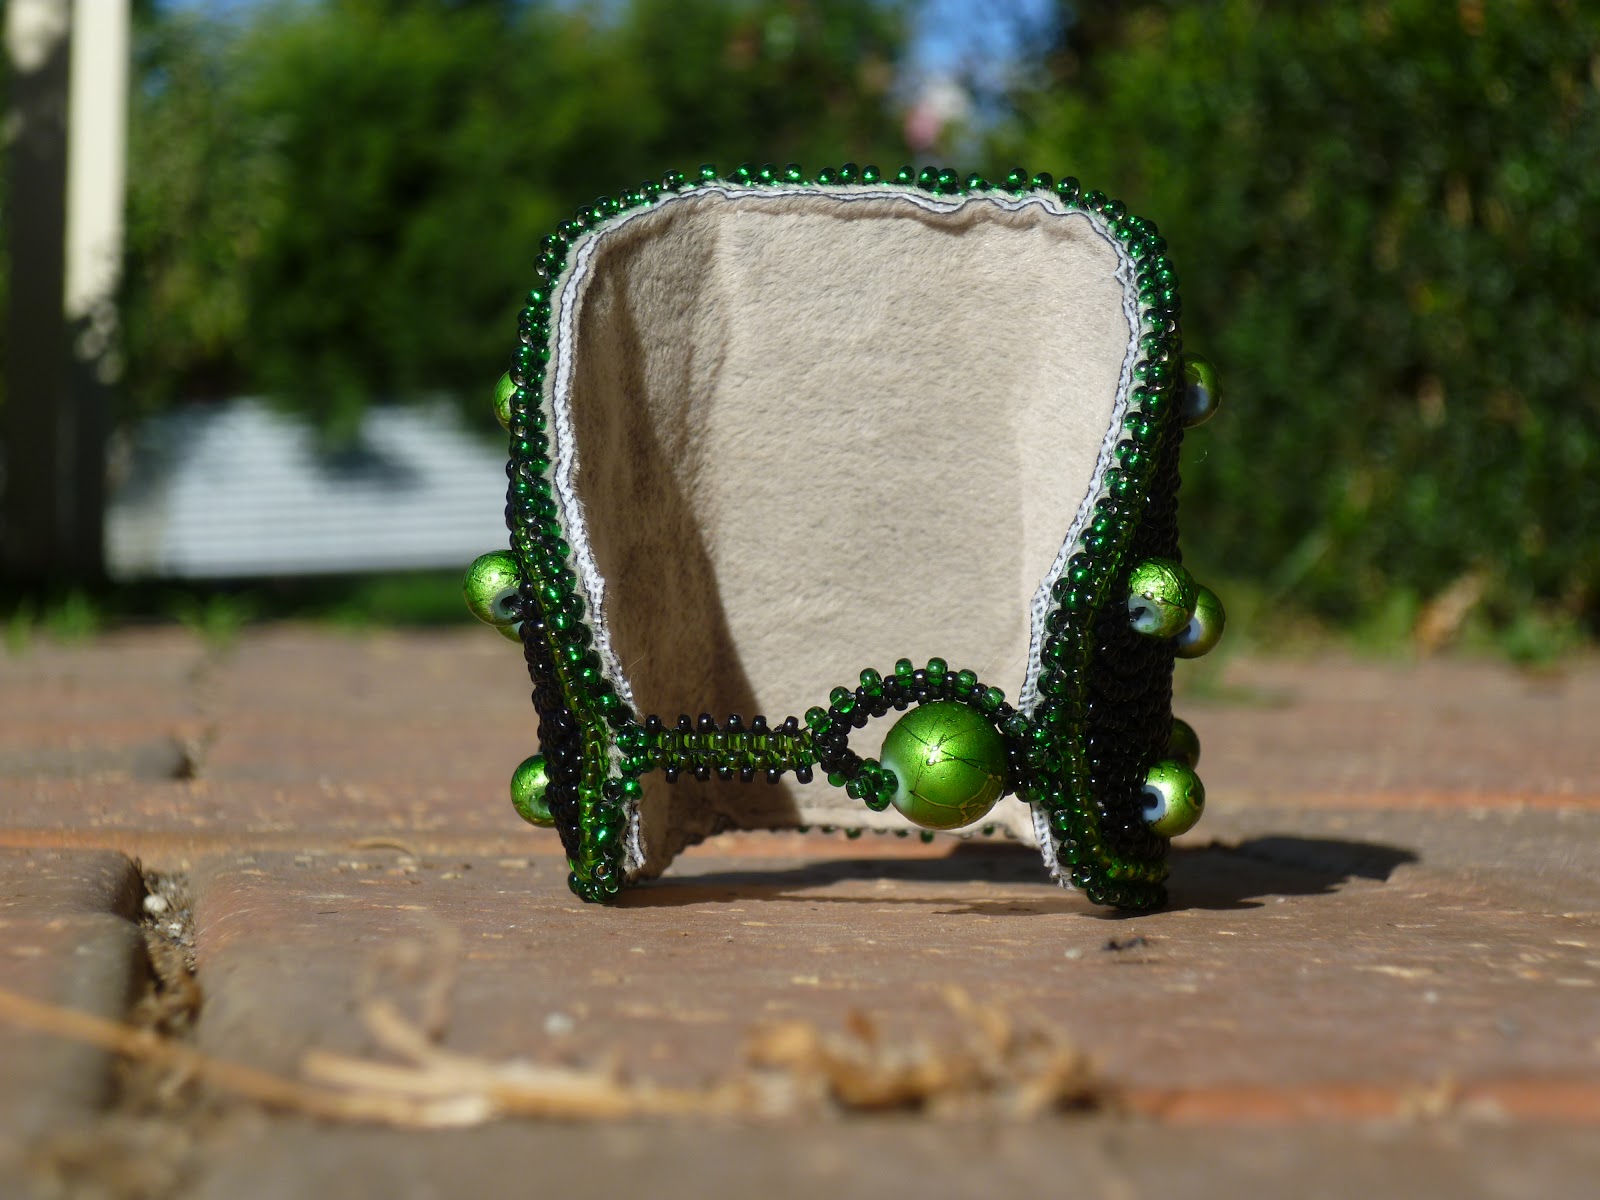
This cuff features a large cat's eye cabochon matched with the same type of beads I used in Red Beauty, but obviously in lime green this time. For this cuff I decided to use black as the background this time (I'm aiming to use neutral colours for the background in all the cuffs, except perhaps one...), and I think it gives it a funky, sassy feel. I'm very happy with the results.
You can see that, when the cuff bends, you can slightly see the pale green suede I beaded on underneath. At first I wasn't happy about this, but then after a while I decided I liked it. It's just a hint of green and I think it gives a nice effect...
The beauty of using cat's eye cabochons or beads is the way it reflects light. I was quite facinated with the textures within the colours of the cab depending on the angle of the light that shone on it. Away from direct light, it's a quite dark green, but shine some light on it and these playful lines of light green and lime start to appear. It was for this reason I had diffuculty deciding what colour green I should use to bezel the cab. If you look closely at Red Beauty's cab, I used three different types: a light transparent red, then a dark transparent red after a few rounds, and finally finishing with a silver-lined dark red. I wanted to keep this the same with all the cuffs. So in Lime Spider I finally decided on lime transparent, then dark transparent green, before finishing up with a silver lined dark green. I think it works well. Finishing with a silver-lined round of seed beads seems to give the cab a hint of brightness, which I had noticed with Red Beauty as well. This effect will DEFINATELY be kept constant in future cuffs in the collection.
I'm still playing around with the clasps on these cuffs, so while this one is quite similar to that in Red Beauty, it still has a few differences. Firstly, because Lime Spider is shorter in length than Red Beauty (it currently actually fits me, can you believe it?!), the beaded band that connects the toggle loop to the actual cuff had to be longer. I'm happy with how this clasp looks, but in future I feel that the band should be wider (thoughts?), as the cuff itself is quite wide.
I had also been recently reading through some beading books/mags/websites/etc (AGAIN :P) and I kept seeing an interesting type of clasp come up again and again, where the peyote loop almost looked embellished. Finally I discovered that it involved using two sizes of seed beads. So here it is!
(see, told you it fits :P)
I used a different kind of suede than that of Red Beauty, and so this one feels even more soft on your skin! It feels very nice, may I just say. :)
And of course, everyone loves free stuff, so here's the free pair of matching earrings that come with the cuff.
So there you have it: Lime Spider, the second installment to the Elegant Elements Cuff Collection. Hope you enjoy her!
Oh, study break's now over, back to work... Y'know, I haven't beaded for a week just so I can't get distracted with how that wonderful braelet is looking so far, how nicely that collar is coming together, how absolutely gorgeous that pendant will be if I can just allow myself to finish it... (Stop it Meg, you're getting ideas :P) Let's just say I'm having withdrawals again...
Happy beading!
Meg
I am a self taught beader and love to create handmade jewelry. I have also started to dabble in beading "art" items, such as dolls/beaded figerines and masks. My current facination is bead embroidery, a technique I have loved for ages and have recently started to learn. You can check out my work at www.abeadedworld.etsy.com. I am also a proud member of the Etsy Beadweavers Team. You can check out their blog at: http://www.etsy-beadweavers.blogspot.com. Thanks for looking!
Thursday, 19 April 2012
Saturday, 14 April 2012
Red Beauty
One day I went to the local craft store and began buying beads, as you do, and I came upon a large, coral-red, oval cabochon. Actually, I found a lot of cabs, and this was one of the ones that caught my eye (this craft store doesn't generally have cabochons, so I get excited when I can find some). So I began to look for some beads that might go with it and found some red glass beads with a "funky" coating on them. I'd been wanting to make a bracelet for someone for a while, and this seemed perfect!
So when I got home, I drew out a design, cut out a template and traced it onto my suede and glued on the lovely stone cab I'd just bought, plus two smaller goldstone cabochons. And then I find out that the person that I'd originally intended this cuff for didn't actually like this shade of red, nor did she like to wear bracelets. WELL. That was a bummer. Now what?
So I did the only thing natural: I threaded my needle, picked up some seed beads and began bezelling the cab. :D I sewed on the glass beads in a pattern, and beaded around them in a circle-y/swirly pattern.
As I was beading I imagined making several of these cuffs in different colours, all with the same basic style but each having something slightly different about them (I know that the thing that will separate this cuff from the rest is the two smaller cabochons). I could have a collection, and sell them all! So the Elegant Elements Cuff Collection was born.
NOTE: due to the fact that this cuff WAS actually intended for a specific person, it is a bit bigger than what the other ones will be. This cuff will fit a minimum wrist of 7.25"-7.5".
Gold, red and a little bit of bronze make up this cuff. It's finished with a peyote stitched loop and bead clasp. I used silver lined seed beads, and when it's in the sun this cuff really sparkles and shines! I couldn't stop drooling over it! If it wasn't for the fact that I also don't wear red (I have one shirt with red on it, and it's red and white striped), and that my wrist is half the size of this cuff (I'm tiny haha) I would keep it! But I don't, and it isn't, so I won't.
SO. That means it is available for purchase by you, dear reader, or by that girl down the street, or the nice lady who's currently internet shopping. And I haven't even told you about the BONUS GIFT that comes with the purchase of this cuff: A free pair of earrings! I had a few of those glass beads left over (they came in a pack of 6mm and 10mm beads), so I made a pair of matching earrings. This will be the case with every cuff in this cuff collection (to see all my collections, including my Seasons Collection, click on the "Collections" section in my shop).
Due to my opinion that this cuff is absolutely awesome, and indeed IS One Of A Kind (OOAK), and that it looks a real beauty in the sunshine, and that I REALLY wish I wore red (:P) I have decided to name her "Red Beauty."
Thankyou very much for looking, and being a part of my excitement for my brand new collection! "Lime Spider" is up next :D
Keep Beading
Meg
So when I got home, I drew out a design, cut out a template and traced it onto my suede and glued on the lovely stone cab I'd just bought, plus two smaller goldstone cabochons. And then I find out that the person that I'd originally intended this cuff for didn't actually like this shade of red, nor did she like to wear bracelets. WELL. That was a bummer. Now what?
So I did the only thing natural: I threaded my needle, picked up some seed beads and began bezelling the cab. :D I sewed on the glass beads in a pattern, and beaded around them in a circle-y/swirly pattern.
As I was beading I imagined making several of these cuffs in different colours, all with the same basic style but each having something slightly different about them (I know that the thing that will separate this cuff from the rest is the two smaller cabochons). I could have a collection, and sell them all! So the Elegant Elements Cuff Collection was born.
NOTE: due to the fact that this cuff WAS actually intended for a specific person, it is a bit bigger than what the other ones will be. This cuff will fit a minimum wrist of 7.25"-7.5".
Gold, red and a little bit of bronze make up this cuff. It's finished with a peyote stitched loop and bead clasp. I used silver lined seed beads, and when it's in the sun this cuff really sparkles and shines! I couldn't stop drooling over it! If it wasn't for the fact that I also don't wear red (I have one shirt with red on it, and it's red and white striped), and that my wrist is half the size of this cuff (I'm tiny haha) I would keep it! But I don't, and it isn't, so I won't.
SO. That means it is available for purchase by you, dear reader, or by that girl down the street, or the nice lady who's currently internet shopping. And I haven't even told you about the BONUS GIFT that comes with the purchase of this cuff: A free pair of earrings! I had a few of those glass beads left over (they came in a pack of 6mm and 10mm beads), so I made a pair of matching earrings. This will be the case with every cuff in this cuff collection (to see all my collections, including my Seasons Collection, click on the "Collections" section in my shop).
Due to my opinion that this cuff is absolutely awesome, and indeed IS One Of A Kind (OOAK), and that it looks a real beauty in the sunshine, and that I REALLY wish I wore red (:P) I have decided to name her "Red Beauty."
Thankyou very much for looking, and being a part of my excitement for my brand new collection! "Lime Spider" is up next :D
Keep Beading
Meg
Labels:
beauty,
collection,
cuff,
cuff collection,
exciting,
fancy,
gold,
pretty,
red,
red beauty
Thursday, 12 April 2012
The biggest seed beads you'll ever find!
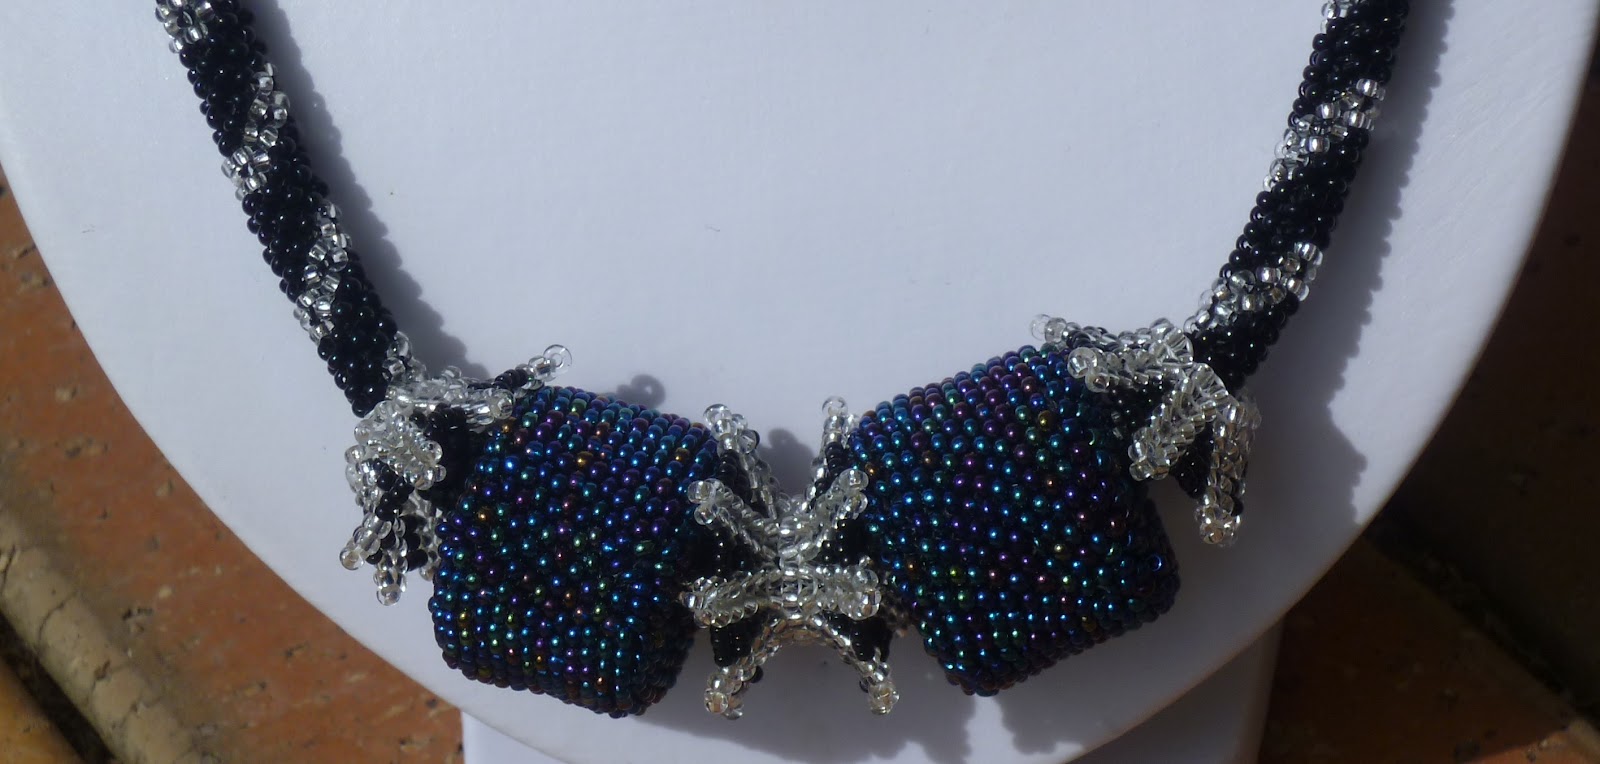
Say HELLO to the two largest seed beads. Currently, at 6:22PM Australian (in Victoria) time on the 12th of April 2012, the two above beads are the biggest seed beads you'll find anywhere (well, according to google)!
This month at the Etsy Bead Weavers Team, the challenge was "Seed Beads Only." Participants were challenged to create a piece of work using only seed bead (ie, round or delicas mainly).
I thought long and hard about this challenge theme about what I could make, and I couldn't think of anything! I thought I wouldn't be entering, until I had a dream a couple of weeks ago about giant seed beads. And I thought, what the heck? Nothing speaks "seed beads only" better than giant seed beads!
If you remove the beadwork over the seed beads you'll find blue polymer clay rings underneath. They look quite basic but they actually took a LOT of work. I wanted the colour to match the beads I was going to use (blue iris), so I spent an entire afternoon trying to make the perfect colour blend. They mainly consist of light blue perle, but I also incorporated black (make it darker), royal blue, sky blue, a blue in between the previous two shades listed, and just the faintest hint of purple. I think I did quite a good job to be honest! They had to match the beads properly so they couldn't be seen at all through the gaps in the bead work, as this wouldn't have had just eed beads showing, and that would have been against the rules (can you imagine if I'd used bright yellow?). There was also the issue of trying to make strips of this colour the same width and height, and then joining the strips into rings with them all having the same circumference, and not having the join thicker than the rest of the ring.
I had originally intended to make 6 beaded seed beads (I made 6 rings! The looked like blue cheezles when I took them out of the oven!), but after taking almost 2 weeks to bead just two, I was fast running out of time. So I left it with two.
In my head I had imagined beading around the PMC rings long ways in tubular peyote stitch using 11os. But after beading several rows I found that the beading that was going around the inside of the ring was ending up further along than that on the outside, and so the nice neat rows were suddenly out of wack. So I changed to using 15os when I got to the inside, and kept the 11os on the outside, and cut out the original rows I'd done. Yet after several round of that (more than just using 11os) I found the same thing to be happening. So finally I stopped doing that section, and started another section a third of the way around the ring, and beaded this section until the frustrating wacky-ness began to start again and the 15os inside the ring joined up, and then did another segment. Finally, when the inside was all zipped up, I filled in the gaps on the outside until I could zip up the outside beadwork. Whew! A LOT of work!
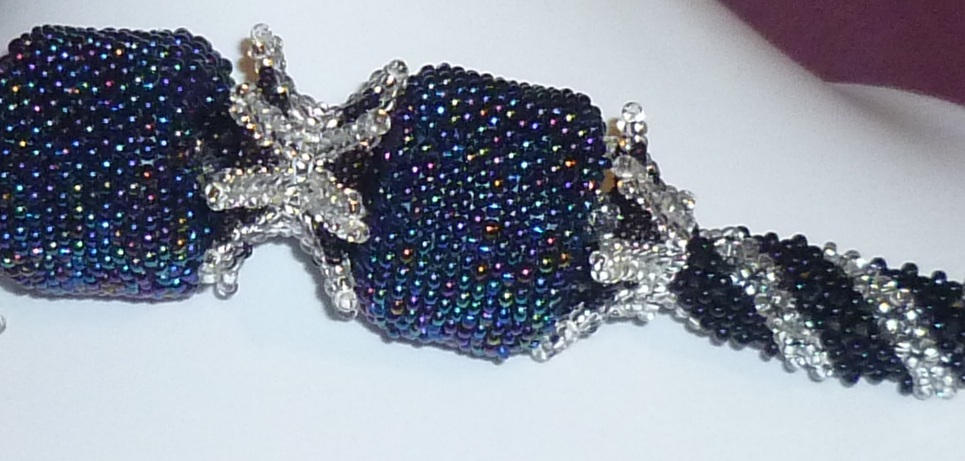
The next drama I had was trying to work out how I could separate the beads on the rope, as I wanted them to be the focal point, so I needed something to space them out a bit. Space... Hmmm, spacers!! A friend of mine had once shown me a picture of some beaded spacers she'd found somewhere, so I tried to create something that looked like what I could remember of it. I had recently found instructions to increasing within the herringbone stitch, and after a bit of thought and trial and error and bit of excess thread and sicssors, the above pictured beaded spacers were born! I'm quite happy with them, so hopefully I can remember how to do them for future works!
The rope was also interesting (and time consuming, and trial and error!). I used right angle weave (RAW), but I wanted to have a silver pattern running through it. So I drew out a few rows of RAW and coloured in a diagonal line of where the silver (these "few rows" turned into a whole page lol) and began beading. I've never beaded RAW off a chart before... But I have only done it twice :P This massive long strip of RAW I then sewed into a massive long tube around a black leather cord. The clasp is simply peyote stitched. I ended up using three stitches in this necklace: peyote, herringbone and RAW.
Making these beads (actually, this whole necklace) was very much trial and error. I'm not generally very good at designing my own beadwoven (ie, specifically beadwoven, bead embroidery is easier) creations without a pattern of some sort. I don't know how to manipulate stitches to do certain things, or to fit with certain beads, or to work in some special way, very well, so trying to create what was in my brain was an extra challenge for me. But I have found this to be getting easier to do (althought I have such a long way to go!) with the more bead embroidery I do, as it allows me to explore the concept of design and I can actually create what's in my head!
I hope you like Size 0.005, the largest seed beads you'll ever find. It was definately an experience!
Voting for the "Seed Beads only" EBWC is currently happening on the blog, so feel free to head on over and vote for your favourite between now and April 15th (mine is number 36, if your favourite happens to be mine)! :)
Happy Beading!!
Meg
This month at the Etsy Bead Weavers Team, the challenge was "Seed Beads Only." Participants were challenged to create a piece of work using only seed bead (ie, round or delicas mainly).
I thought long and hard about this challenge theme about what I could make, and I couldn't think of anything! I thought I wouldn't be entering, until I had a dream a couple of weeks ago about giant seed beads. And I thought, what the heck? Nothing speaks "seed beads only" better than giant seed beads!
If you remove the beadwork over the seed beads you'll find blue polymer clay rings underneath. They look quite basic but they actually took a LOT of work. I wanted the colour to match the beads I was going to use (blue iris), so I spent an entire afternoon trying to make the perfect colour blend. They mainly consist of light blue perle, but I also incorporated black (make it darker), royal blue, sky blue, a blue in between the previous two shades listed, and just the faintest hint of purple. I think I did quite a good job to be honest! They had to match the beads properly so they couldn't be seen at all through the gaps in the bead work, as this wouldn't have had just eed beads showing, and that would have been against the rules (can you imagine if I'd used bright yellow?). There was also the issue of trying to make strips of this colour the same width and height, and then joining the strips into rings with them all having the same circumference, and not having the join thicker than the rest of the ring.
I had originally intended to make 6 beaded seed beads (I made 6 rings! The looked like blue cheezles when I took them out of the oven!), but after taking almost 2 weeks to bead just two, I was fast running out of time. So I left it with two.
In my head I had imagined beading around the PMC rings long ways in tubular peyote stitch using 11os. But after beading several rows I found that the beading that was going around the inside of the ring was ending up further along than that on the outside, and so the nice neat rows were suddenly out of wack. So I changed to using 15os when I got to the inside, and kept the 11os on the outside, and cut out the original rows I'd done. Yet after several round of that (more than just using 11os) I found the same thing to be happening. So finally I stopped doing that section, and started another section a third of the way around the ring, and beaded this section until the frustrating wacky-ness began to start again and the 15os inside the ring joined up, and then did another segment. Finally, when the inside was all zipped up, I filled in the gaps on the outside until I could zip up the outside beadwork. Whew! A LOT of work!
The next drama I had was trying to work out how I could separate the beads on the rope, as I wanted them to be the focal point, so I needed something to space them out a bit. Space... Hmmm, spacers!! A friend of mine had once shown me a picture of some beaded spacers she'd found somewhere, so I tried to create something that looked like what I could remember of it. I had recently found instructions to increasing within the herringbone stitch, and after a bit of thought and trial and error and bit of excess thread and sicssors, the above pictured beaded spacers were born! I'm quite happy with them, so hopefully I can remember how to do them for future works!
The rope was also interesting (and time consuming, and trial and error!). I used right angle weave (RAW), but I wanted to have a silver pattern running through it. So I drew out a few rows of RAW and coloured in a diagonal line of where the silver (these "few rows" turned into a whole page lol) and began beading. I've never beaded RAW off a chart before... But I have only done it twice :P This massive long strip of RAW I then sewed into a massive long tube around a black leather cord. The clasp is simply peyote stitched. I ended up using three stitches in this necklace: peyote, herringbone and RAW.
Making these beads (actually, this whole necklace) was very much trial and error. I'm not generally very good at designing my own beadwoven (ie, specifically beadwoven, bead embroidery is easier) creations without a pattern of some sort. I don't know how to manipulate stitches to do certain things, or to fit with certain beads, or to work in some special way, very well, so trying to create what was in my brain was an extra challenge for me. But I have found this to be getting easier to do (althought I have such a long way to go!) with the more bead embroidery I do, as it allows me to explore the concept of design and I can actually create what's in my head!
I hope you like Size 0.005, the largest seed beads you'll ever find. It was definately an experience!
Voting for the "Seed Beads only" EBWC is currently happening on the blog, so feel free to head on over and vote for your favourite between now and April 15th (mine is number 36, if your favourite happens to be mine)! :)
Happy Beading!!
Meg
Friday, 9 March 2012
La Mia Italia
Hello!! Long time, no posting. Sorry about that. See, I got back from Europe about 2 weeks ago... :D
Yep, that's right. EUROPE. :D I spent 6 weeks over there and it was absolutely fabulous! I have a new appreciation for Winter now. Man it was cold! But I saw snow for the first time, and now I can legitimately attest that every snowflake is indeed different, and wonderfully magically AMAZING. :D
I went to 9 different countries while I was away, and who knows how many cities. Ready? Here's the list:
-Scotland (Glasgow, Edinburugh, up north near the Loch Ness and all the places up there)
-England (Exeter, Bath, Statford-upon-avon, Stonehenge, London)
-France (Paris, Lyon, Nice)
-Switzerland (Lucerne)
-Spain (Barcelona)
-Italy (Pisa, Florence, Rome, Venice)
-Austria (Vienna)
-Czech Republic (Prague)
-Germany (Munich, Berlin)
-The Netherlands (Amsterdamn)
Wow, 10 different countries! :D
Scotland
Stonehenge, England
The March EBW challenge theme is "destinations:" pick a place you'd like to go and bead about it. WELL. I had a great many choices didn't I? Most of the places I went to I'd love to go to again one day. What do I choose? Orignially I wasn't going to enter the challenge, as I thought I wouldn't be back in time to make something, but I was desperate to bead so I did anyway. :P
Scotland was my favourite place, definately. But I didn't really know what I could do for Scotland. I wanted lots of iconic things in my bracelet, and I couldn't think of that many that I could do for Scotland in such a limited time. So that was out.
I really enjoyed Vienna; I love Mozart you see. So I started planning a cuff that would have the Austrian flag around the outside and images of musical notes and stars (Mozart wrote "Twinkle, Twinkle Little Star" when he was 5, hence the stars), and have white beaded snow swirling around, perhaps an Ice skate as well (I went ice skating in Vienna). So I started beading the flag: Red, white, leave the last colour (red again) for when I line the piece. But then half way through doing the white I decided that I didn't want to do Vienna anymore...
Italy! Thank goodness the flags were similar. I looked through my european coin collection and found a 2 euro cent coin. I'd thrown a 2 euro cent coin into the Trevi Fountain in Rome. Apparently if you threw one coin in it means you'll come back to Rome; two means you'll fall in love, and three means you'll fall for an Italian. So I put the coin on the bracelet, to represent the one (or perhaps two... :P) coin I threw in. I'd like to go back to Rome.
But then I couldn't think of very many things that were exclusive to Rome that I could put on the bracelet. I could put a cross, but there were churches all over Italy. I could put a pizza, but that's more of a "whole of Italy" thing as well. So then my sister came up with the suggestion: why not just make it about the whole of Italy?
Thankyou, dear wonderful sister! :D So it became the whole of Italy. I made a slice of pizza and a venitian mask from polymer clay and put them on, I sewed a cross on, I stitched a ring of blue around the coin (to represent the water in the Trevi fountain), the coin is there too (to represent the coin I threw in the fountain, and also Italy's currency: the Euro), "ITALIA" is beaded on there, and the background is white to represent the snow that was there when I went, and that I'd like to go back in Winter again (I LOVE snow :D ) one day. And around the border: the Italian flag, finished with the edging.
(Funnily enough, the ring I'm also wearing in this photo I bought in Italy (Florence))
It's backed with suede and closes with a toggle clasp.

So there you have it! "La Mia Italia": my Italy. :D
Please vote for your favourite "Destinations" challenge entry between the 9th and 15th of March here (mine is number 32 if you'd like to know). :) It's the 3rd largest amount of entries for a challenge so far!
Back to work now :D
Meg
Yep, that's right. EUROPE. :D I spent 6 weeks over there and it was absolutely fabulous! I have a new appreciation for Winter now. Man it was cold! But I saw snow for the first time, and now I can legitimately attest that every snowflake is indeed different, and wonderfully magically AMAZING. :D
I went to 9 different countries while I was away, and who knows how many cities. Ready? Here's the list:
-Scotland (Glasgow, Edinburugh, up north near the Loch Ness and all the places up there)
-England (Exeter, Bath, Statford-upon-avon, Stonehenge, London)
-France (Paris, Lyon, Nice)
-Switzerland (Lucerne)
-Spain (Barcelona)
-Italy (Pisa, Florence, Rome, Venice)
-Austria (Vienna)
-Czech Republic (Prague)
-Germany (Munich, Berlin)
-The Netherlands (Amsterdamn)
Wow, 10 different countries! :D
Scotland
Stonehenge, England
The March EBW challenge theme is "destinations:" pick a place you'd like to go and bead about it. WELL. I had a great many choices didn't I? Most of the places I went to I'd love to go to again one day. What do I choose? Orignially I wasn't going to enter the challenge, as I thought I wouldn't be back in time to make something, but I was desperate to bead so I did anyway. :P
Scotland was my favourite place, definately. But I didn't really know what I could do for Scotland. I wanted lots of iconic things in my bracelet, and I couldn't think of that many that I could do for Scotland in such a limited time. So that was out.
I really enjoyed Vienna; I love Mozart you see. So I started planning a cuff that would have the Austrian flag around the outside and images of musical notes and stars (Mozart wrote "Twinkle, Twinkle Little Star" when he was 5, hence the stars), and have white beaded snow swirling around, perhaps an Ice skate as well (I went ice skating in Vienna). So I started beading the flag: Red, white, leave the last colour (red again) for when I line the piece. But then half way through doing the white I decided that I didn't want to do Vienna anymore...
Italy! Thank goodness the flags were similar. I looked through my european coin collection and found a 2 euro cent coin. I'd thrown a 2 euro cent coin into the Trevi Fountain in Rome. Apparently if you threw one coin in it means you'll come back to Rome; two means you'll fall in love, and three means you'll fall for an Italian. So I put the coin on the bracelet, to represent the one (or perhaps two... :P) coin I threw in. I'd like to go back to Rome.
But then I couldn't think of very many things that were exclusive to Rome that I could put on the bracelet. I could put a cross, but there were churches all over Italy. I could put a pizza, but that's more of a "whole of Italy" thing as well. So then my sister came up with the suggestion: why not just make it about the whole of Italy?
Thankyou, dear wonderful sister! :D So it became the whole of Italy. I made a slice of pizza and a venitian mask from polymer clay and put them on, I sewed a cross on, I stitched a ring of blue around the coin (to represent the water in the Trevi fountain), the coin is there too (to represent the coin I threw in the fountain, and also Italy's currency: the Euro), "ITALIA" is beaded on there, and the background is white to represent the snow that was there when I went, and that I'd like to go back in Winter again (I LOVE snow :D ) one day. And around the border: the Italian flag, finished with the edging.
(Funnily enough, the ring I'm also wearing in this photo I bought in Italy (Florence))
It's backed with suede and closes with a toggle clasp.
So there you have it! "La Mia Italia": my Italy. :D
Please vote for your favourite "Destinations" challenge entry between the 9th and 15th of March here (mine is number 32 if you'd like to know). :) It's the 3rd largest amount of entries for a challenge so far!
Back to work now :D
Meg
Tuesday, 10 January 2012
Winter Wonderland...in the middle of Summer...
Ok ok, I know this is a bit late, but I'm writing to you today about The Etsy Bead embroidery Guild (EBEG)'s first Bead Fest- "Winter Wonderland" (a bit stange for me, as I'm currently in the middle of Summer here Down Under). All the entries were submitted by January 1st, and may I just say that they're all absolutely WONDERFUL entries. :D You can view them all on our team blog. Please take a moment to head on over and check them all out. :)
(collage of all our pieces)
And now I'd like to talk to you about the thoughts and ideas behind my piece- Winter's Fingerprints.
I suggested the theme "Winter Wonderland" for the Bead Fest, and when the team voted, most of us voted for this one. Which was sort of perfect for me, as I now had an excuse to make a piece for Winter for my "Season's collection," to go with my Autumn piece. I was asked to find an inspiring picture and give a description of the theme. As I was trying to find a suitable image on Google, and writing my description, I kept coming across snowflakes. I think they're even mentioned in the description I gave. And suddenly, snowflakes were all I could think about...
It is said that each and every snow flake is different; each is an individual. This thought got me thinking... I was studying for a biology exam at the time, and we'd done a huge section on genetics. Genetics, huh? Genes, inheritance, all the things that make us different, individual. And I thought of our fingerprints: how each is different; each is an individual. You cannot find a single finger that has the same print as another finger, not even on your own hand (I bet you just looked :P ). Pretty amazing!
I knew I wanted to make a necklace, that much was clear. And as I was thinking about snowflakes and fingerprints, ideas started to flash across my mind. What if I made a whole heap of snowflakes...joined them together...like so... gradual size decrease...that one can be the fanciest...I'll have to research this...like a collar, almost!!! (and there you have it, my crazy brain in thought process :P ) I sketched a basic design and went back to studying.
This was an unuasual piece in that I had decided the name of it well before I'd even begun stitching, something I don't usually do. I love giving my pieces names, it makes them so much more alive and special, and person. For this one, it had to be something to do with Winter. And snowflakes. Fingerprints. Snowflakes. Individual. Special. Different. Could Mother Nature have her own fingerprints? Hmm... Mother Nature's fingerprints. Snowflakes. Mother Nature's snowflakes. Winter's snowflakes. Winter's fingerprints. Aha! "Winter's Fingerprints." It fit perfectly, even if I hadn't even cut out fabric or picked my colour pallette. It was going to be perfect.
I did a lot of research on this piece. I had no real idea what a snowflake could look like. And I wanted the biggest one, the "focal," if you like, to be the most special, fanciest one. So I set out to find the most beautiful and appealing (well, to me) snowflakes online that I could. Here was the inspiration for the big one (the latter is also shown on the right):
I love this one, it's just magical. :)
I came across more snowflakes, some of which were inspiration for the others-
And then after about 2 or 3 snowflakes I couldn't find any that I thought were absolutely brilliant that were, at the same time, simple enough to be able to be stitched at a small scale. So I started trying to make up my own. Which I found to be rather difficult after a while, because I couldn't make them really complex looking because there just wasnt enough ROOM, and there's only so many tiny snowflakes you can bead all differently before they'll begin to start looking the same. So it's a good thing I found I only needed to make 5 in all...
(close up's of each side)
Snowflakes are typically displayed/shown/photographed on black, to show it up most clearly. So this is what I did here: beading on black material, yet not filling in the background, to give an impression of the snowflae being momentarily "caught" on the fabric. The largest one was big enough that I could cut around it's whole shape proerly, but the smaller ones were not big enough for this. So I settled for cutting them out in hexagon shapes.
I chose a very simple colour pallette: opaque white, metallic silver, pearlized/milky white, and silver lined clear (silver). I wanted to make it simple to show up the snowflakes properly. But it wouldn't be truely Winter if there wasn't the faintest hint of blue, now would it? And this comes in in the attachments between the snowflakes, and in the ribbon, which finished off the piece.
I used 4 different ribbons in finishing: pale grey, white, silver and pale/ice blue. The clasp is a simple toggle. This finishing is quite simple as I wanted to keep the magic of this piece in the snowflakes; the magic of Winter. I almost added a fringe, I'd always intended to have a fringe, and lots of bling. I even went and bought the beads for the fringe! But then I found it didn't need one. It's beautiful as it is: just snowflakes.
(collage of all our pieces)
And now I'd like to talk to you about the thoughts and ideas behind my piece- Winter's Fingerprints.
I suggested the theme "Winter Wonderland" for the Bead Fest, and when the team voted, most of us voted for this one. Which was sort of perfect for me, as I now had an excuse to make a piece for Winter for my "Season's collection," to go with my Autumn piece. I was asked to find an inspiring picture and give a description of the theme. As I was trying to find a suitable image on Google, and writing my description, I kept coming across snowflakes. I think they're even mentioned in the description I gave. And suddenly, snowflakes were all I could think about...
It is said that each and every snow flake is different; each is an individual. This thought got me thinking... I was studying for a biology exam at the time, and we'd done a huge section on genetics. Genetics, huh? Genes, inheritance, all the things that make us different, individual. And I thought of our fingerprints: how each is different; each is an individual. You cannot find a single finger that has the same print as another finger, not even on your own hand (I bet you just looked :P ). Pretty amazing!
I knew I wanted to make a necklace, that much was clear. And as I was thinking about snowflakes and fingerprints, ideas started to flash across my mind. What if I made a whole heap of snowflakes...joined them together...like so... gradual size decrease...that one can be the fanciest...I'll have to research this...like a collar, almost!!! (and there you have it, my crazy brain in thought process :P ) I sketched a basic design and went back to studying.
This was an unuasual piece in that I had decided the name of it well before I'd even begun stitching, something I don't usually do. I love giving my pieces names, it makes them so much more alive and special, and person. For this one, it had to be something to do with Winter. And snowflakes. Fingerprints. Snowflakes. Individual. Special. Different. Could Mother Nature have her own fingerprints? Hmm... Mother Nature's fingerprints. Snowflakes. Mother Nature's snowflakes. Winter's snowflakes. Winter's fingerprints. Aha! "Winter's Fingerprints." It fit perfectly, even if I hadn't even cut out fabric or picked my colour pallette. It was going to be perfect.
I did a lot of research on this piece. I had no real idea what a snowflake could look like. And I wanted the biggest one, the "focal," if you like, to be the most special, fanciest one. So I set out to find the most beautiful and appealing (well, to me) snowflakes online that I could. Here was the inspiration for the big one (the latter is also shown on the right):
I love this one, it's just magical. :)
I came across more snowflakes, some of which were inspiration for the others-
And then after about 2 or 3 snowflakes I couldn't find any that I thought were absolutely brilliant that were, at the same time, simple enough to be able to be stitched at a small scale. So I started trying to make up my own. Which I found to be rather difficult after a while, because I couldn't make them really complex looking because there just wasnt enough ROOM, and there's only so many tiny snowflakes you can bead all differently before they'll begin to start looking the same. So it's a good thing I found I only needed to make 5 in all...
Snowflakes are typically displayed/shown/photographed on black, to show it up most clearly. So this is what I did here: beading on black material, yet not filling in the background, to give an impression of the snowflae being momentarily "caught" on the fabric. The largest one was big enough that I could cut around it's whole shape proerly, but the smaller ones were not big enough for this. So I settled for cutting them out in hexagon shapes.
I chose a very simple colour pallette: opaque white, metallic silver, pearlized/milky white, and silver lined clear (silver). I wanted to make it simple to show up the snowflakes properly. But it wouldn't be truely Winter if there wasn't the faintest hint of blue, now would it? And this comes in in the attachments between the snowflakes, and in the ribbon, which finished off the piece.
I used 4 different ribbons in finishing: pale grey, white, silver and pale/ice blue. The clasp is a simple toggle. This finishing is quite simple as I wanted to keep the magic of this piece in the snowflakes; the magic of Winter. I almost added a fringe, I'd always intended to have a fringe, and lots of bling. I even went and bought the beads for the fringe! But then I found it didn't need one. It's beautiful as it is: just snowflakes.
And there you have it: Winter's very own Fingerprints; the snowflakes that will never melt. :D
Keep beading!
Meg
Saturday, 31 December 2011
Happy new year!!
It's the last day of 2011. The last 40 minutes actually, over here in Aus-land. Can you believe it? 12 months ago we were preparing to come into this year, full of our own personal hopes, dreams, expectations and goals. Was 2011 what you expected?
At the start of each year, I go through the goals I had for the year just ended and think through them, then write a new set of goals, usually about 8-10, to hang on my wall for the next 12 months. A couple of those goals have been on the list for a few years running now...
3rd on the list for this year was "Continue to improve my beading skill," 5th was "Maintain friendships. Make new friends. Accept losses," 7th was "Enjoy the year of 2011," and 8th was "Learn a new craft." I am happy to share with you, readers, that I feel I have accomplished these things. Did you fullfill any of your goals for 2011?
I have many highlights of this year. One was learning bead embroidery, a technique I know cannot believe I had never survived without. :P Another was learning to walk up and down stairs again. I've had a hip problem for about 6 years now, and last year (2010) I had surgery to help fix it. I've only been walking up stairs for the past couple of months; before that, I hadn't been able to do it for 3 years. It's been amazing that I am finally able to start doing more with my body, on this journey of healing.
Friendships made, maintained, and repairing makes another highlight. This year was my first year of University, and I have met the most amazing people through that, through my new church, and through my beading, on Etsy. Leaving school has helped me to find my true friends, and I've loved maintaining contact with those who really matter. And those friendships that have been broken, it has been truely amazing to see people completely turn around and become different people, and to be able to repair a once-broken friendship with them is something really special.
So what are your highlights?
Just a little something to leave you with-my entry to the EBEG Bead Fest, "Winter Wonderland." It's called "Winter's Fingerprints" and features 5 totally different snowflakes. Hope you like it! :) Blog post to come...
I wish you all the best in the new year of 2012 (only 5 minutes away!!), may you all keep safe and have your most special dreams and hopes fullfilled. God bless you all :)
And happy beading!
Meg
At the start of each year, I go through the goals I had for the year just ended and think through them, then write a new set of goals, usually about 8-10, to hang on my wall for the next 12 months. A couple of those goals have been on the list for a few years running now...
3rd on the list for this year was "Continue to improve my beading skill," 5th was "Maintain friendships. Make new friends. Accept losses," 7th was "Enjoy the year of 2011," and 8th was "Learn a new craft." I am happy to share with you, readers, that I feel I have accomplished these things. Did you fullfill any of your goals for 2011?
I have many highlights of this year. One was learning bead embroidery, a technique I know cannot believe I had never survived without. :P Another was learning to walk up and down stairs again. I've had a hip problem for about 6 years now, and last year (2010) I had surgery to help fix it. I've only been walking up stairs for the past couple of months; before that, I hadn't been able to do it for 3 years. It's been amazing that I am finally able to start doing more with my body, on this journey of healing.
Friendships made, maintained, and repairing makes another highlight. This year was my first year of University, and I have met the most amazing people through that, through my new church, and through my beading, on Etsy. Leaving school has helped me to find my true friends, and I've loved maintaining contact with those who really matter. And those friendships that have been broken, it has been truely amazing to see people completely turn around and become different people, and to be able to repair a once-broken friendship with them is something really special.
So what are your highlights?
Just a little something to leave you with-my entry to the EBEG Bead Fest, "Winter Wonderland." It's called "Winter's Fingerprints" and features 5 totally different snowflakes. Hope you like it! :) Blog post to come...
I wish you all the best in the new year of 2012 (only 5 minutes away!!), may you all keep safe and have your most special dreams and hopes fullfilled. God bless you all :)
And happy beading!
Meg
Monday, 26 December 2011
Merry Christmas!!
Merry Christmas everyone! Over here in Australia, it's currently 6:30pm on boxing day, so the merry christmas is a little late... Did you all have a nice day? I love Christmas, and honouring God on this special day.
WELL. Now that everyone has been given all their presents, I feel no shame in revealing them all to you. :)
The first is this wall hanging that was for my older sister:
It is Psalm 121:1-2. There's a Christian band in the USA called Casting Crowns (really awesome!), and they wrote a song called "Praise You in This Storm." My older sister had this song played at her baptism a few years ago, and the bridge of the song is these verses. There's an image of hills, with the rising sun and cross on the top most hill, at the bottom (as you can see).
Second is a crimminal/robber guy I made for my younger brother. I had already made him a policeman for his birthday earlier this year, and he wanted a robber to go with it. The clothes are bead woven, and air dry clay makes up the feet, hands, head and body. Based on a pattern by Jill Oxton. The legs and arms consist of tahitian black pearls and black/white glass beads, threaded on wire with the ends buried in the clay.
This is the robber and policeman together. I quite proud of these little people!
And of course there's that cuff I made for my other sister, shown on a different post.
And I also made TWO sales in the week just gone:
My Twisted in Blue Brilliance necklace, which was my entry into the EBW November challenge this year
And these earrings, which are sort of like Christmas trees. Maybe. They're Christmas earrings, anyway.
So I hope you all had a wonderful Christmas, and that Santa was good to you!
I'm off to finish my "Winter Wonderland" for the EBEG Bead Fest. :D
Meg
WELL. Now that everyone has been given all their presents, I feel no shame in revealing them all to you. :)
The first is this wall hanging that was for my older sister:
It is Psalm 121:1-2. There's a Christian band in the USA called Casting Crowns (really awesome!), and they wrote a song called "Praise You in This Storm." My older sister had this song played at her baptism a few years ago, and the bridge of the song is these verses. There's an image of hills, with the rising sun and cross on the top most hill, at the bottom (as you can see).
Second is a crimminal/robber guy I made for my younger brother. I had already made him a policeman for his birthday earlier this year, and he wanted a robber to go with it. The clothes are bead woven, and air dry clay makes up the feet, hands, head and body. Based on a pattern by Jill Oxton. The legs and arms consist of tahitian black pearls and black/white glass beads, threaded on wire with the ends buried in the clay.
This is the robber and policeman together. I quite proud of these little people!
And I also made TWO sales in the week just gone:
My Twisted in Blue Brilliance necklace, which was my entry into the EBW November challenge this year
And these earrings, which are sort of like Christmas trees. Maybe. They're Christmas earrings, anyway.
So I hope you all had a wonderful Christmas, and that Santa was good to you!
I'm off to finish my "Winter Wonderland" for the EBEG Bead Fest. :D
Meg
Subscribe to:
Posts (Atom)